Missing details: AWS Amplify, Cognito User Pool vs Identity Pool and Social Sign-in in React
Here you can find information on integrating your React app with User Pool and Identity Pool based Social-Sign-in such as Google, Facebook, Apple etc.
There are primarily two ways to authenticate users of your web/mobile application with AWS client while using Social Sign-in:
- User Pool: User pools are user directories that provide sign-up and sign-in options for your web and mobile app users.
- Identity Pool: Identity pools provide AWS credentials to grant your users access to other AWS services.
I will skip the details of User Pool and Identity Pool. Here is some high level information:

In most common scenarios, you will be using authenticated user obtained from Social-Sign-in for accessing AWS services. It can be done in two ways:


When you are integrating your app with the AWS Cognito, you can chose either of the two ways based on your requirements. You can take decision to use one vs another based on various factors. One advantage that I see with the user-pool is, you have greater control on your users.
Their ways of integration via AWS Amplify was not very clear in the documentation. You can find most of the details in Amplify documentation. Here, you can find some additional information on Social Sign-in integration.
Initial Setup on AWS Cognito
Note: while creating app-client, clear the option Generate client secret. The client secret is used by applications that have a server-side component that can secure the client secret.

3. Configure a Hosted User Pool Domain
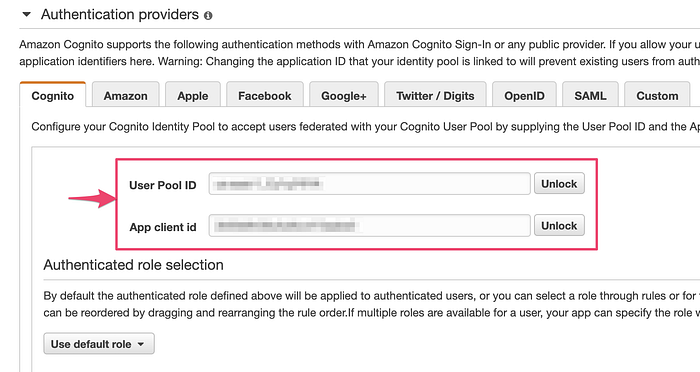
5. Configure an Authentication Provider under the Identity Pool settings (you can access it via Edit Identity Pool option). Select Cognito tab under Authentication providers. Enter User Pool Id and App Client Id created in first two steps. Save changes.
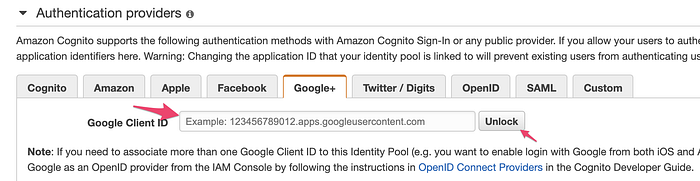
6. Setup Social Auth providers: For Identity Pool setup, follow the steps listed at https://docs.aws.amazon.com/cognito/latest/developerguide/external-identity-providers.html. For User Pool setup, follow the steps listed under section https://docs.amplify.aws/lib/auth/social/q/platform/js#setup-your-auth-provider
7. Basic setup of Amplify app: lets build on top of Recommended Usage.

Social Sign-in via Identity Pool
Step 1 — Modify awsconfig object
Change the awsconfig object to include Identity Pool Id information.
Don’t add Auth.oauth object details. It is only needed for User Pool configuration and not required for Identity Pool scenario.
import Amplify, { Auth } from 'aws-amplify';Amplify.configure({
  Auth: {
    identityPoolId: 'XX-XXXX-X:XXXXXXXX-XXXX-1234-abcd-1234567890ab',
    // Amazon Cognito User Pool ID
    userPoolId: 'XX-XXXX-X_abcd1234',
    // Amazon Cognito Web Client ID (26-char alphanumeric string)
    userPoolWebClientId: 'a1b2c3d4e5f6g7h8i9j0k1l2m3',
    region: 'XX-XXXX-X',
    // Required only if it's different from Amazon Cognito Region
    identityPoolRegion: 'XX-XXXX-X',

    // OPTIONAL - Enforce user authentication prior to accessing AWS resources or not
    mandatorySignIn: true,
    authenticationFlowType: 'USER_SRP_AUTH',
    ...    ...
    // federationTarget: ""; A new value of federationTarget will not be needed to the config. Instead it will infer the behavior from the existing configuration values. Ref: https://github.com/aws-amplify/amplify-js/issues/2716
  },
...});
Step 2 — Modify AmplifyAuthenticator
Are your trying to find how to enable Social sign-in buttons? Use federated props.
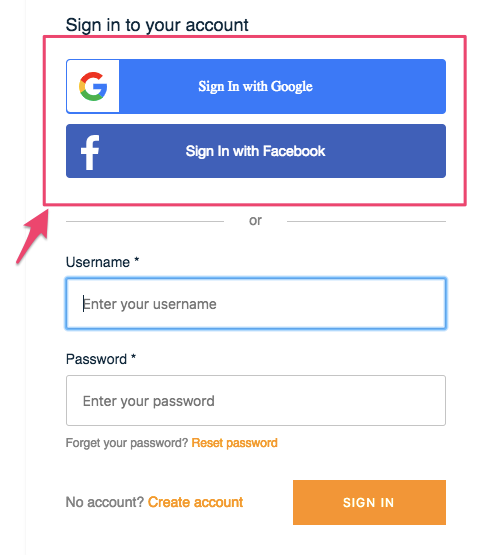
Add federated prop withFederatedConfig object to AmplifyAuthenticator. It will enable and show the social sign-in buttons on the Amplify built-in Sign-in UI.
Missing information/details: FederatedConfig
You can enable the Federated Social-Sign-in buttons by passing the FederatedConfig object
// amplify-ui-components/src/common/types/auth-types.tsexport interface FederatedConfig {
 auth0Config?: {
  audience?: string;
  clientID: string;
  domain: string;
  responseType: string;
  redirectUri: string;
  returnTo?: string;
  scope?: string;
 };
 amazonClientId?: string;
 facebookAppId?: string;
 googleClientId?: string;
 oauthConfig?: {
  [key: string]: any;
 };
}
Your AmplifyAuthenticator code will change to:
import { AmplifyAuthContainer, AmplifyAuthenticator, , AmplifySignIn, AmplifySignOut, AmplifySignUp } from '@aws-amplify/ui-react';
import { AuthState, onAuthUIStateChange } from '@aws-amplify/ui-components';
...const federated = {
  googleClientId: 'XXXXXXXXX.apps.googleusercontent.com',
  facebookAppId: 'XXXXXX',
};const AuthComponent = (props) => {...
...return (
    <AmplifyAuthenticator usernameAlias="email" federated={federated}>
      <AmplifySignIn slot="sign-in" usernameAlias="email" federated={federated} >
      </AmplifySignIn>
    </AmplifyAuthenticator>
  );
}
Step 3 — Add Authentication Providers in Cognito
If you haven’t already configured Social Auth Providers under Identity Pool, please do that now. https://docs.aws.amazon.com/cognito/latest/developerguide/external-identity-providers.html
Run the application. And, try to sign-in using Social Sign-in buttons. It should work!
Social Sign-in via User Pool
Step 1 — Cofigure User Pool domain
Follow the instructions listed at https://docs.aws.amazon.com/cognito/latest/developerguide/cognito-user-pools-assign-domain-prefix.html


Also, add Social Auth provider details.


Step 2— Modify awsconfig object
Change the awsconfig object to include User Pool information.
You can skip Auth.identityPoolId which is not required for User Pool scenario
import Amplify, { Auth } from 'aws-amplify';Amplify.configure({
  Auth: {
    // Amazon Cognito User Pool ID
    userPoolId: 'XX-XXXX-X_abcd1234',
    // Amazon Cognito Web Client ID (26-char alphanumeric string)
    userPoolWebClientId: 'a1b2c3d4e5f6g7h8i9j0k1l2m3',
    // Region
    region: 'XX-XXXX-X',

    // OPTIONAL - Enforce user authentication prior to accessing AWS resources or not
    mandatorySignIn: true,// Hosted UI configuration
    oauth: {
        // Provide the domain name
        // 1. Create domain in cognito User Pool and use the name here
        // 2. WARNING: Remove http:// or https:// from the URL that you are specifying here
        domain: '<TODO_URL_WITHOUT_HTTPS://_OR_HTTP://>',
        scope: ['phone', 'email', 'profile', 'openid', 'aws.cognito.signin.user.admin'],
        redirectSignIn: 'http://localhost:3000/', // WARNING: Keep a / at the end of the URL and same as specified in Cognito User Pool
        redirectSignOut: 'http://localhost:3000/', // WARNING: Keep a / at the end of the URL and same as specified in Cognito User Pool
        responseType: 'code' // or 'token', note that REFRESH token will only be generated when the responseType is code
    },authenticationFlowType: 'USER_SRP_AUTH',
    ...
    // federationTarget: ""; A new value of federationTarget will not be needed to the config. Instead it will infer the behavior from the existing configuration values. Ref: https://github.com/aws-amplify/amplify-js/issues/2716
  }
});
Warning: Missing information
1. When you set the value of Auth.oauth.domain, remove http:// or https://
2. Keep the redirectSignIn and redirectSignOut URLs same as you mentioned while creating User Pool
Step 3— Modify AmplifyAuthenticator
Are your trying to find how to enable Social sign-in buttons? Use federated props. Look previous section for the details of federatedConfig.
Note: you need to make some changes in AmplifyAuthenticator for User Pool.
Warning: Missing information
If you use AmplifyAuthenticator without calling Auth.federatedSignIn() then it will only try to use Identity Pool.
It would complain and throw errors if you try to Sign-in using social. So, please make the below mentioned changes to call Auth.federatedSignIn() explicitly which would invoke HostedUI for User Pool based authentication.
import Auth, { CognitoHostedUIIdentityProvider } from '@aws-amplify/auth';
import { AmplifyAuthContainer, AmplifyAuthenticator, AmplifyGoogleButton, AmplifySignIn, AmplifySignOut, AmplifySignUp } from '@aws-amplify/ui-react';
import { AuthState, onAuthUIStateChange } from '@aws-amplify/ui-components';const federated = {
  googleClientId: 'XXXXXXXXX.apps.googleusercontent.com',
  facebookAppId: 'XXXXXX',
};const AuthComponent = (props) => {...
...return (
    <AmplifyAuthenticator usernameAlias="email" federated={federated}>
      <AmplifySignIn slot="sign-in" usernameAlias="email" federated={federated} >
          <div slot="federated-buttons">
            <AmplifyGoogleButton onClick={() => Auth.federatedSignIn({
                'provider': CognitoHostedUIIdentityProvider.Google
            })} />
          </div>
      </AmplifySignIn>
    </AmplifyAuthenticator>
  );
}
Run the application. And, try to sign-in using Social Sign-in buttons. It should work!
Miscellaneous Notes
- While specifying Auth.oauth.domain in awsconfig, don’t prefix with http:// or https://
- A new value of
federationTargetwill not be needed to the config. Instead in the design we are inferring the behavior from the existing configuration values. - Auth.federatedSignIn(): When using User Pools, there are no arguments required and provider is optional. If a provider is not given the User Pool Hosted UI will be displayed. If a provider is given the page will redirect to the Hosted UI, but we’ll add a query string to signal an immediate redirect to the social provider’s login page (Facebook, G+, etc.). This allows you to build your own UI but still leverage the User Pool federation. In either case after the user signs in with that provider an account will be created in User Pools and a JWT token returned.
- Identity Pool with Amplify: https://docs.amplify.aws/lib/auth/advanced/q/platform/js
- For multi-tenant best practices, read: https://docs.aws.amazon.com/cognito/latest/developerguide/multi-tenant-application-best-practices.html
- Federated buttons available under AmplifySignIn are: AmplifyGoogleButton, AmplifyFacebookButton, AmplifyAmazonButton, AmplifyAuth0Button, AmplifyOauthButton